On this Monday morning, 12 members gathered at Blaydon station for a tour of five mechanical boxes: Blaydon, Wylam, Prudhoe, Hexham and Haydon Bridge. The signal boxes lie on the route of the old Newcastle & Carlisle Railway (subsequently absorbed into the North Eastern Railway), now known as the Tyne Valley line. Our 14 Feb 2020 fixture (view report) covered west of Haydon Bridge towards Carlisle.
The latest visits were conducted by Graham Lamb, who at the time was a NR local Mobile Operations Manager. Graham's unfailing enthusiasm and knowledge were much appreciated by all present; without him, this visit would likely not have been possible in the same form or even at all. Very great thanks must go to Graham in addition to our member Nick Jones, who organised the visits from our Society side and ensured the day ran smoothly together with the other stewards Barney Clark and Nick Garnham.
The intention was to visit Blaydon box (dating from 1929) first but, due to staff sickness, it was decided to wait until the shift change at 11am, instead travelling to Wylam by road in the meantime. Wylam was the birthplace of the railway pioneer George Stephenson. The box (circa 1897) is one of two boxes visited (the other is Hexham) which are directly over the live railway, mounted atop a cast iron bridging structure, providing a clear view up and down the running lines. Canterbury West is the only other NR box of this form which survives; they are all Grade II Listed. Wylam box is over the Up line (to Newcastle).
A long cast iron staircase leads up to the western side of the wooden box, inside which we were greeted by the duty signaller and a trainee. Wylam works Absolute Block to Blaydon (east, towards Newcastle) and Absolute Block to Prudhoe (west, towards Carlisle). On 11 Jan 1969, the original lever frame was removed, although an old photograph of it, photocopied in the signal box, survives. The frame was replaced by an IFS (Individual Function Switch) panel and the present one is a further replacement for that, albeit with proper bells. Likewise, the original gate wheel and crossing gates have been replaced by a modern pedestal control and manually controlled barrier level crossing, worked by the signaller.
What survives from the past is a 'settle' (a high backed, all wooden seat) with curved jambs, painted red, which the signaller thought is original. There is also a fireplace, now blocked up but presumably it once contained a built-in stove or small range (or maybe even an open fire). The chimney survives. A short but steep flight of wooden steps leads down onto a flat platform area on the gantry above the lines.
One mystery which was not solved on the day was the reason for two treadles, which exist on both lines shortly before the level crossing (in normal running direction) at Wylam. We have since discovered that the extra treadles beyond the respective signals are 'force-down' treadles which, if operated with the signal at danger ('ON'), will short the Track Circuit ahead and immediately cause the flashing red road signals to operate, stopping road traffic, as an emergency overrun measure.
With the bell code 5 (Is the line clear for a Class 6 train - maximum permitted speed 60mph?) heard from up above, the photographers in the group mostly decamped via the footbridge to Wylam Down P2. Freightliner 66538 in the usual green livery was seen leading five empty yellow NR / WASCO‡ flatbed wagons on 6E48 from Carlisle Network Yard to Tyne Sorting Sidings. During the day, the other bell codes heard were 1 (call attention), 2 (train entering section), 2-1 (train out of section), 3-1 (Is line clear for a Class 2 train?) and 4 (Is line clear for a Class 1 train?). https://tinyurl.com/2vrhmn6f has many more.
[‡The Swiss company WASCO / WASCOSA, founded in 1964 by three men: Waelty, Scotti & Sandmeir, now owns and manages 22,000 railway freight wagons in 23 countries and has 150 employees.]
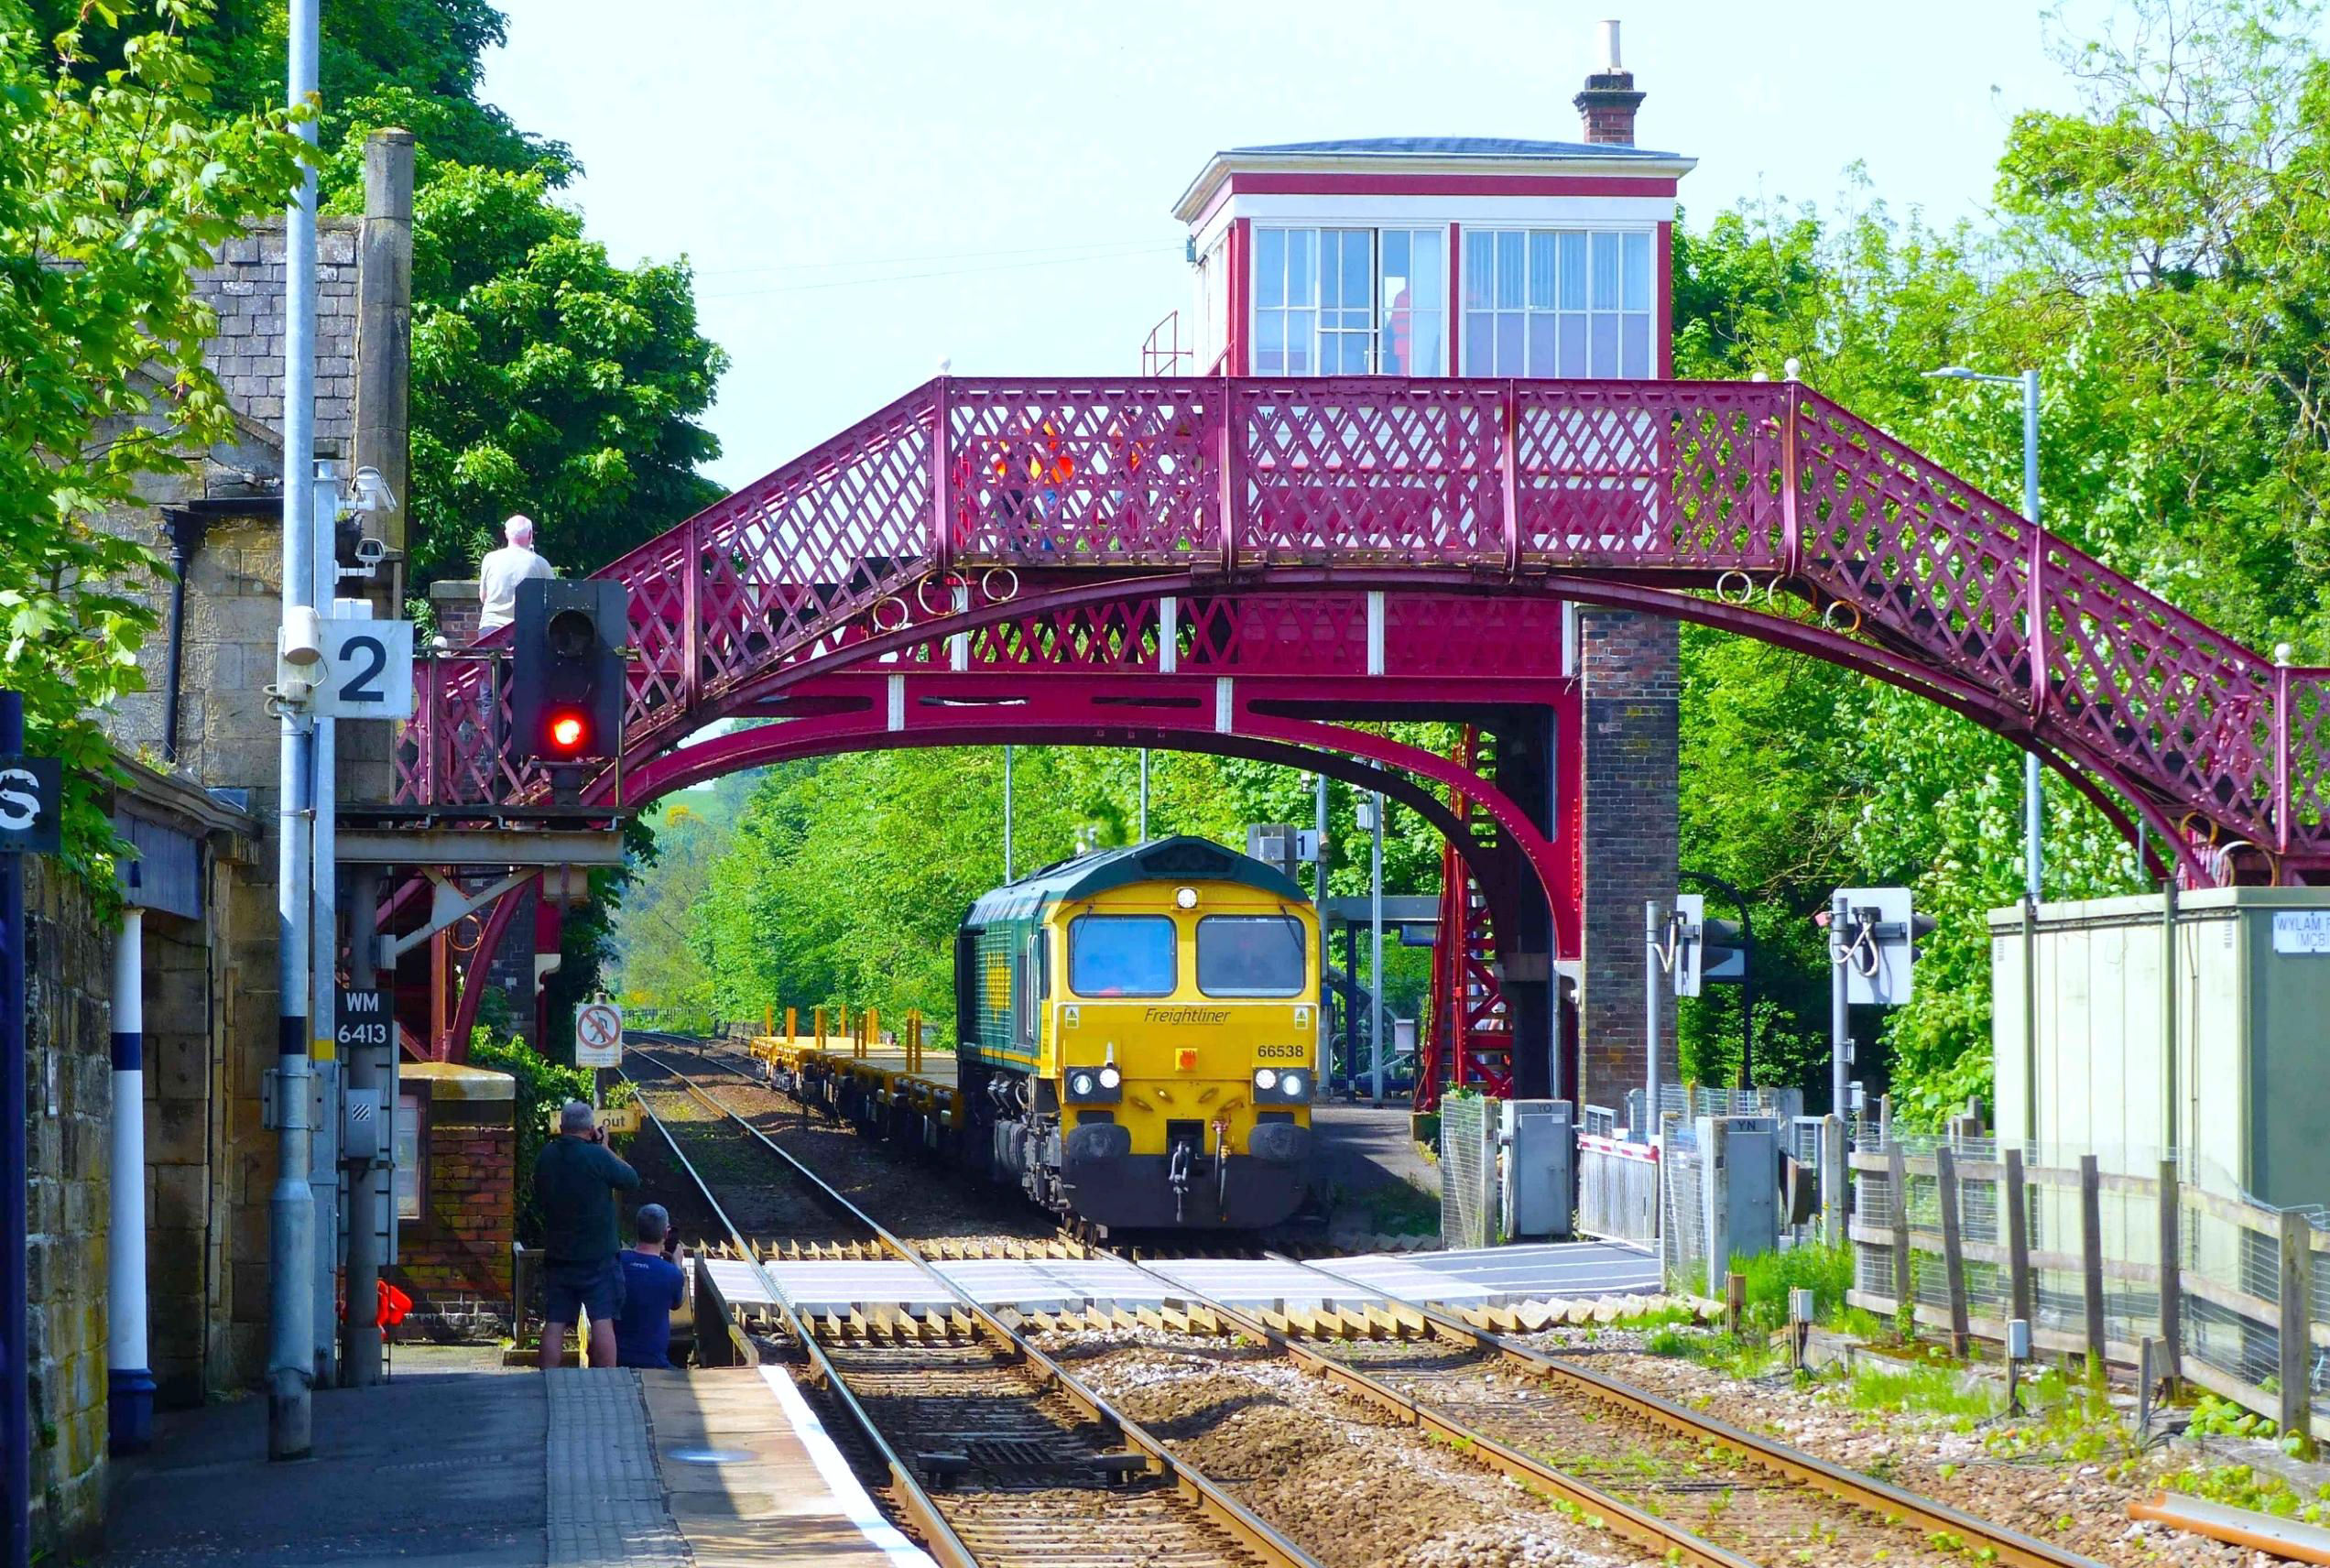
6E48 Carlisle Network Yard to Tyne Sorting Sidings at Wylam, which has staggered platforms.
[© John Cowburn 2024]
6E48 Carlisle Network Yard to Tyne Sorting Sidings at Wylam viewed from the signal box.
[© Nick Jones. 2024]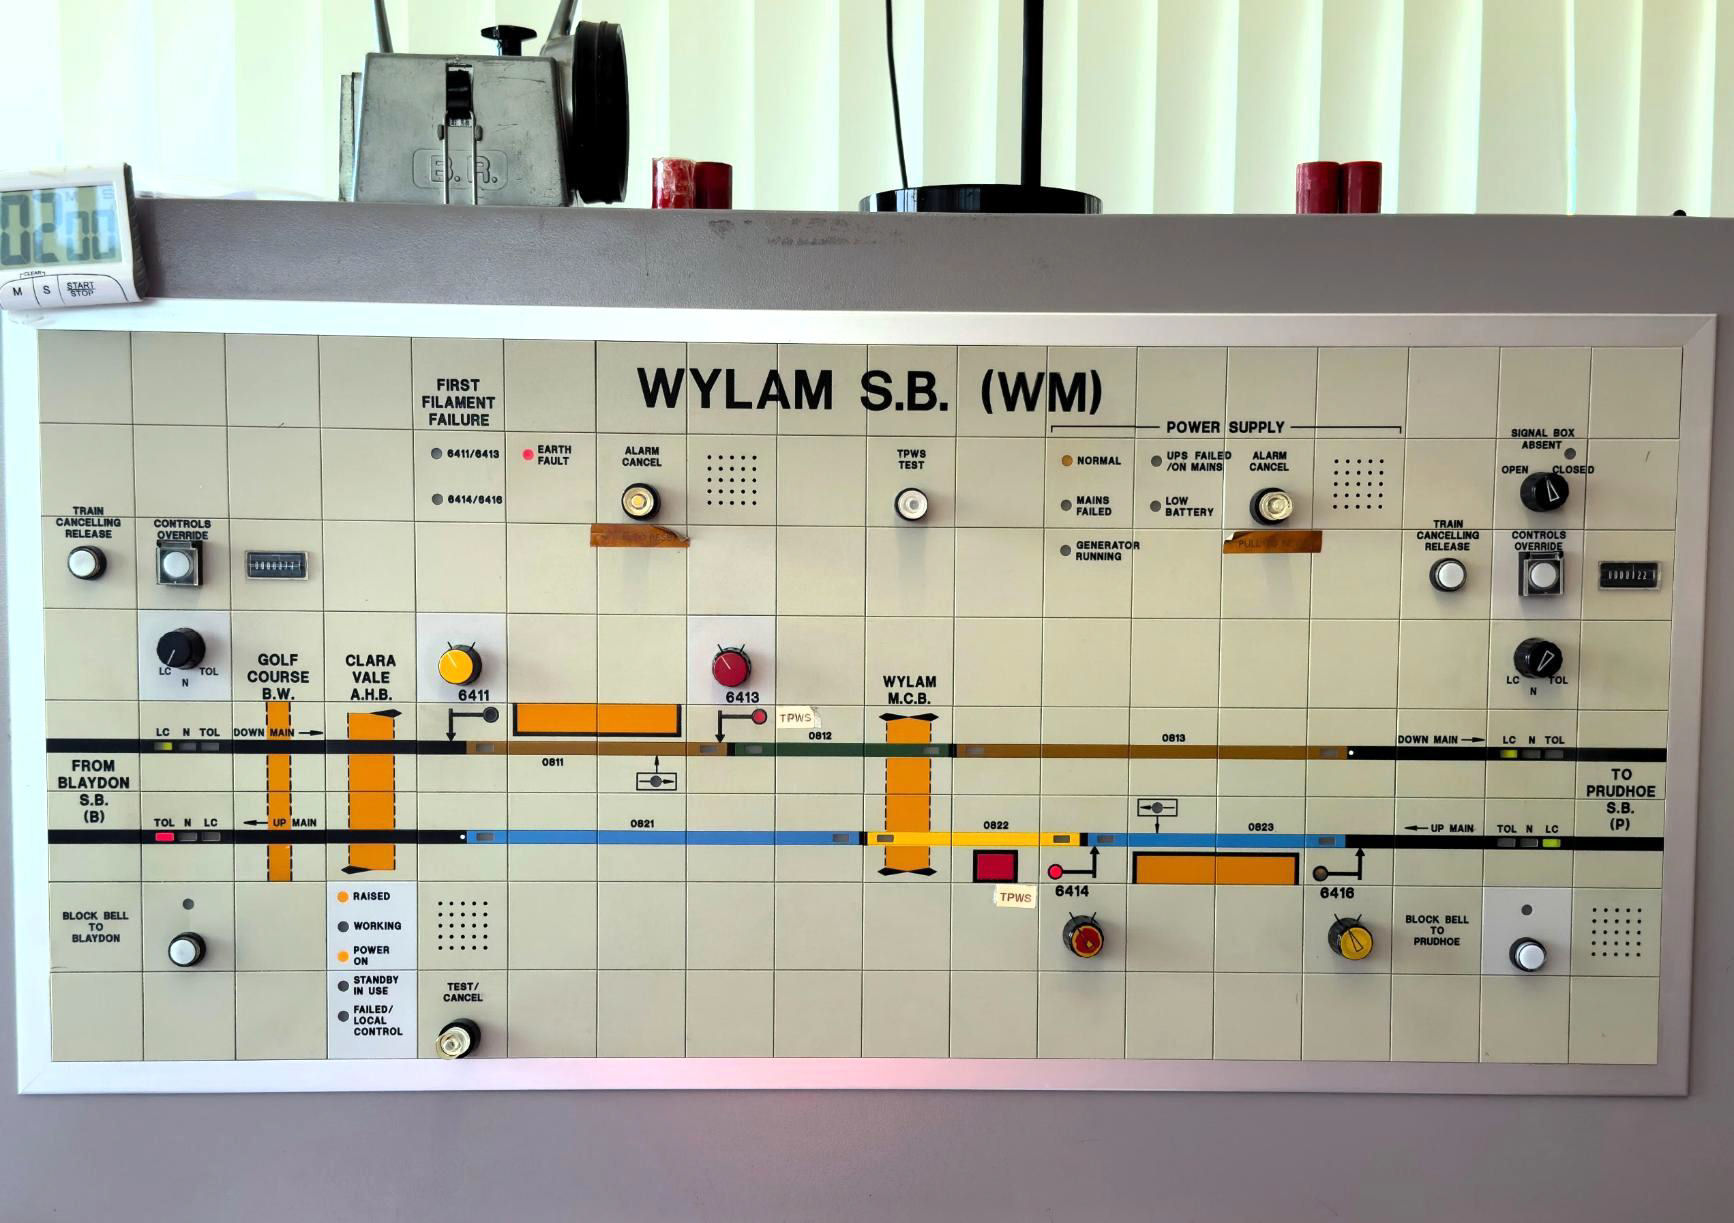
Wylam signal box diagram,
[© Mark Shinwell 2024]Our group, which had been split into three to visit Wylam box, then returned by car to
Blaydon to meet a very enthusiastic and helpful signaller. It is to Graham's credit that Blaydon was not simply missed out due to the need to delay the visit. The box is constructed in brick and lies adjacent to the Up line, although it (unusually) faces away from the railway, being aligned with the long-removed railway on its north side. [This was the former line to Newcastle along the north bank of the Tyne, which crossed the River Tyne on the Scotswood Railway Bridge but closed 4 Oct 1982 when it needed major expenditure. It was the normal passenger route; trains were diverted via the present route through Dunston.] The box has a bricked-up fireplace with corbelled wooden mantle shelf, the latter with a metal drying rail.
The chimney has been removed except for the lower section with stone corbels which can be seen facing the railway. The interlocking room is at ground level, with external steps leading up to a small area of flat roof that looked suitable for a sun lounger, prior to entering the operations floor. The signaller faces north when working the lever frame, originally with 76 levers from when it was a junction with sidings etc but was subsequently reduced, along with the operating storey of the box. Now only 13 levers remain, with just five still in use. The left-hand end of the lever frame is marked 'WB & SS Co Ltd L&NER' (Westinghouse Brake & Saxby Signalling Company; 'Saxby' was later removed from the company name).
Right of the lever frame stands a terminal running Microsoft Windows and Westinghouse train describer software, which is the interface between Blaydon and Tyneside ROC (Rail Operating Centre). (Except for the TRUST - Train Running Under System TOPS - terminal in each box, maybe the only computer monitor seen during the day.) Track Circuit Block is operated on this section unlike in the other direction, towards Wylam, which is worked Absolute Block, controlled by a British Rail (BR) standard block instrument.
Before a train is sent to Tyneside ROC, the signaller inputs the headcode in the terminal, which is kept in a 'pending' state, until said train reaches an appropriate point, when the signaller manually confirms the entry. According to the Blaydon signaller, it is at this time that the Tyneside signaller will first see the train on their train describer computer terminal at their workstation. Wylam box also controls Chain Bridge Manually Controlled Barrier level crossing via a typical pedestal. This was of interest as the level crossing is 50m from the box and the signaller has very limited visibility of approaching traffic - CCTV cameras might be expected or the crossing be given the unusual classification of 'RC' (Remote Control).
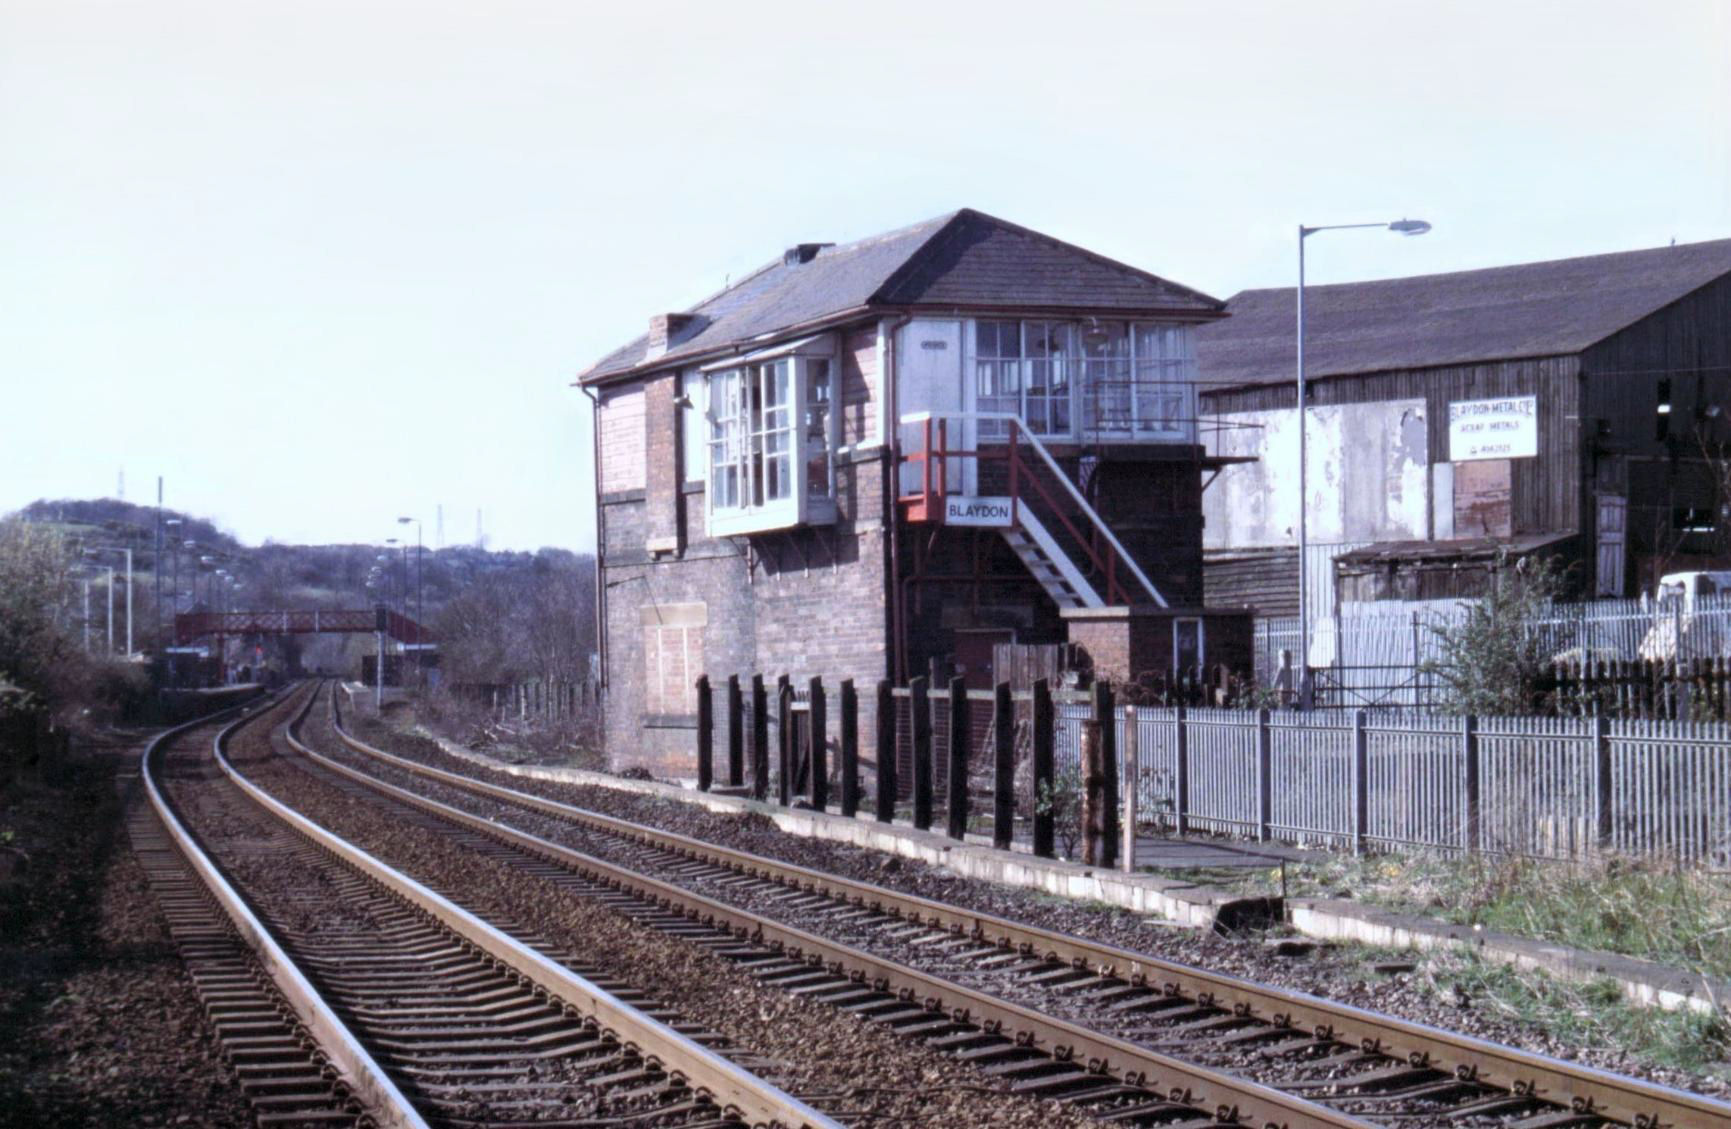
Blaydon box looking west towards Carlisle on 27 Mar 1999. It was some distance east of Blaydon station (ahead) in the 'V' of the junction with the former passenger line (prior to 4 Oct 1982) going off right the other side of the box to Scotswsood Bridge over ther River Tyne
[© Angus McDougall 1999]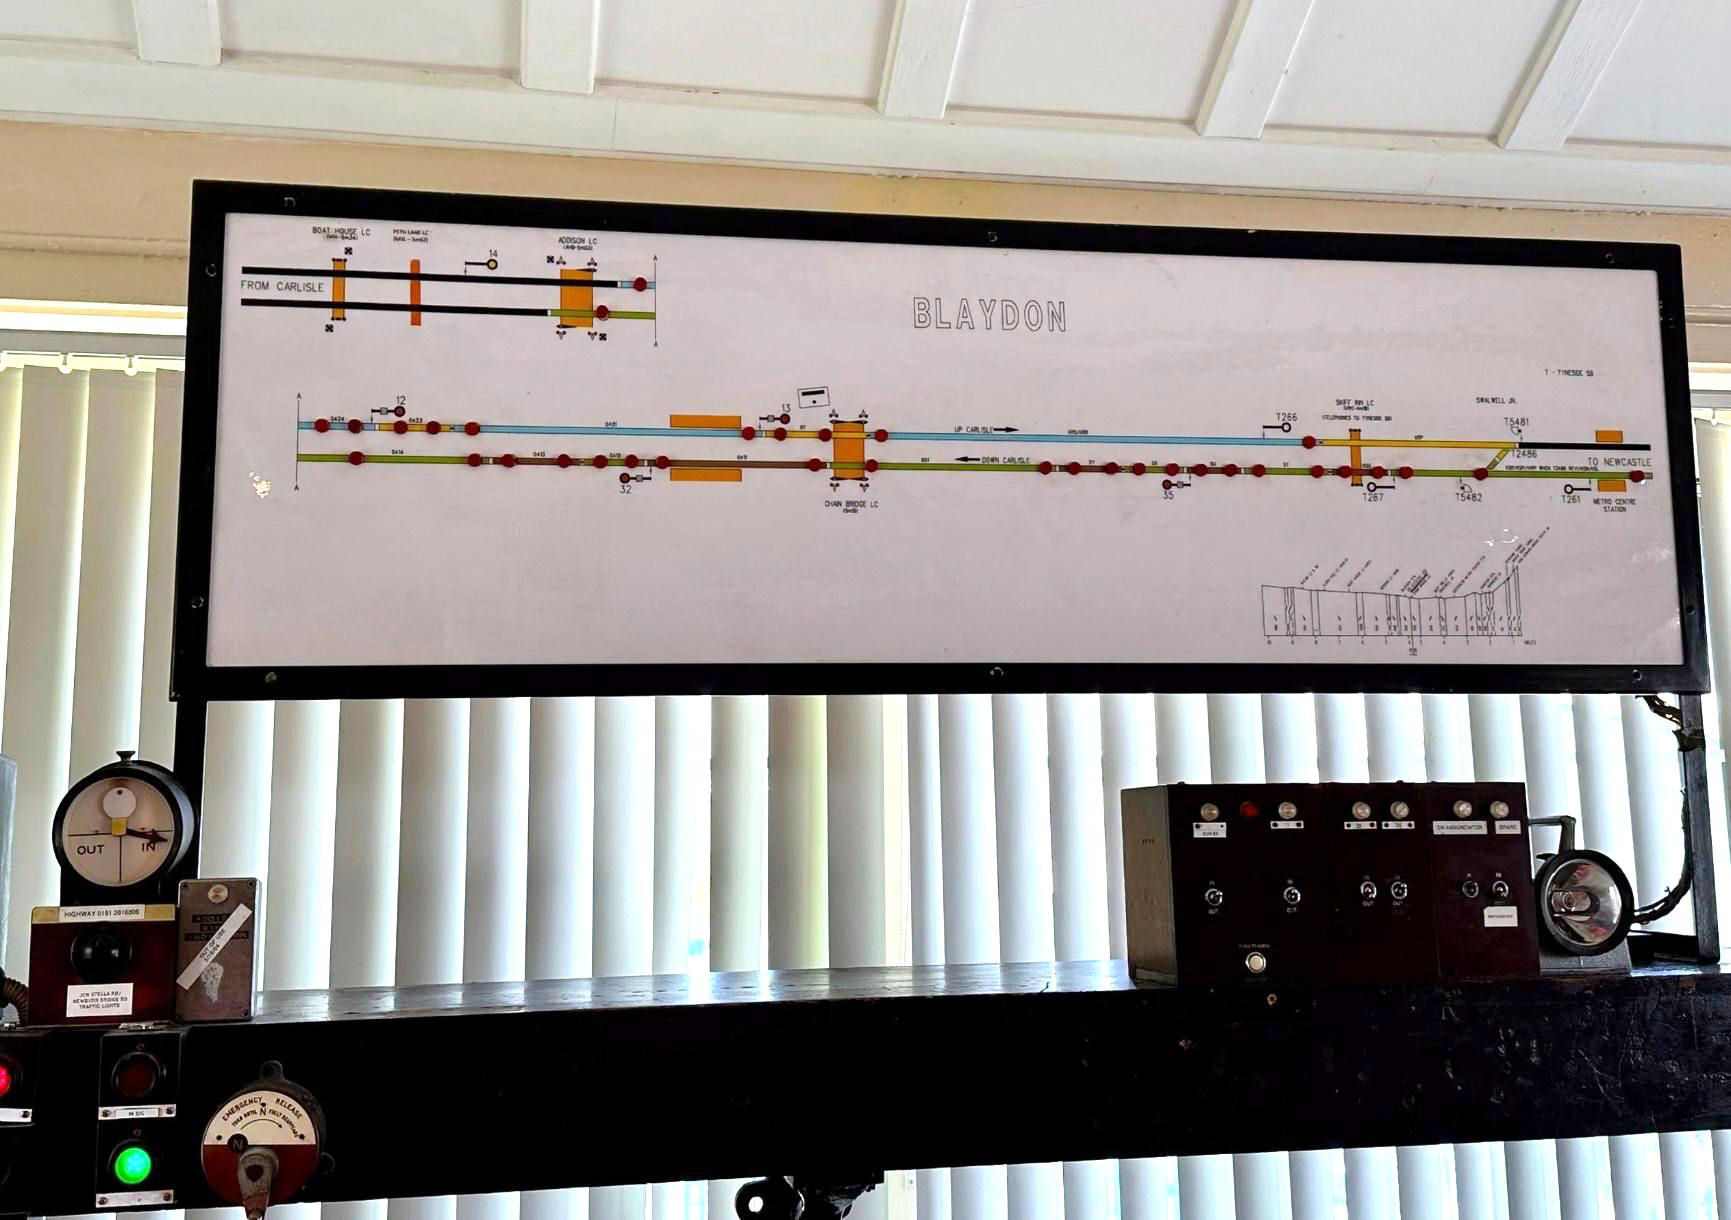
Blaydon signal box diagram.
[© Angus McDougall 1999]After the three groups had finished at Blaydon, it was time to head for the oldest box of the day at
Prudhoe (circa 1872), a tall brick-built structure standing adjacent to the Up line, with a very narrow road bridge dating from 1883 over the River Tyne nearby. Prudhoe, pronounced 'Pruddah', still controls six semaphores (plus one colour light) and colour light distant signals. There is a trailing crossover at the Newcastle end, which has been used for turnbacks. The box, equipped with a modern brick privy alongside, is on three levels; the middle and upper levels are reached by an external wooden staircase with a metal handrail. At the top of the staircase is a small wooden porch. The middle level houses the interlocking, including electric locks and the necessary relays with other equipment for the Track Circuit Block section to the west to Hexham. To the east, to Wylam, is Absolute Block. Part of the middle level communicates with the ground floor level, where various wire cables lead off to points and signals.
The door to Prudhoe operations floor opens behind the 45-lever frame; almost all levers are physically present and 13 remain in use. The frame is marked 'WB & S Co Ltd' at the right-hand end, with the gaps between the lever slots at the front marked 'LNER 1943'. The box works Track Circuit Block to Hexham and trains are described using a single stroke bell. The Absolute Block section to Wylam is controlled by an elderly wooden-cased block instrument, believed to be of LNER origin (second hand from an unknown box - any ideas which one, please?). This instrument has notably faded red areas on its displays.
There is a pedestal for the adjacent Manually Controlled Barrier level crossing far below the signalling floor. Four large iron wheels, painted red, in the northeastern corner of the box, are to adjust the tension of signal wires. A further wheel for adjusting Lever 17 was behind that lever itself. There was no obvious evidence of a previous fireplace, stove or external chimney. However, archive photos found online appear to show a stove pipe poking through the roof towards the southwest corner of the box. There is a noticeable discontinuity in the brickwork on the western side of the box near the top. An old photo from the online John Alsop collection dated prior to 1906 seems to show a balcony on this side of the box, which no longer exists. It seems plausible that the brickwork was built whenever that was removed.
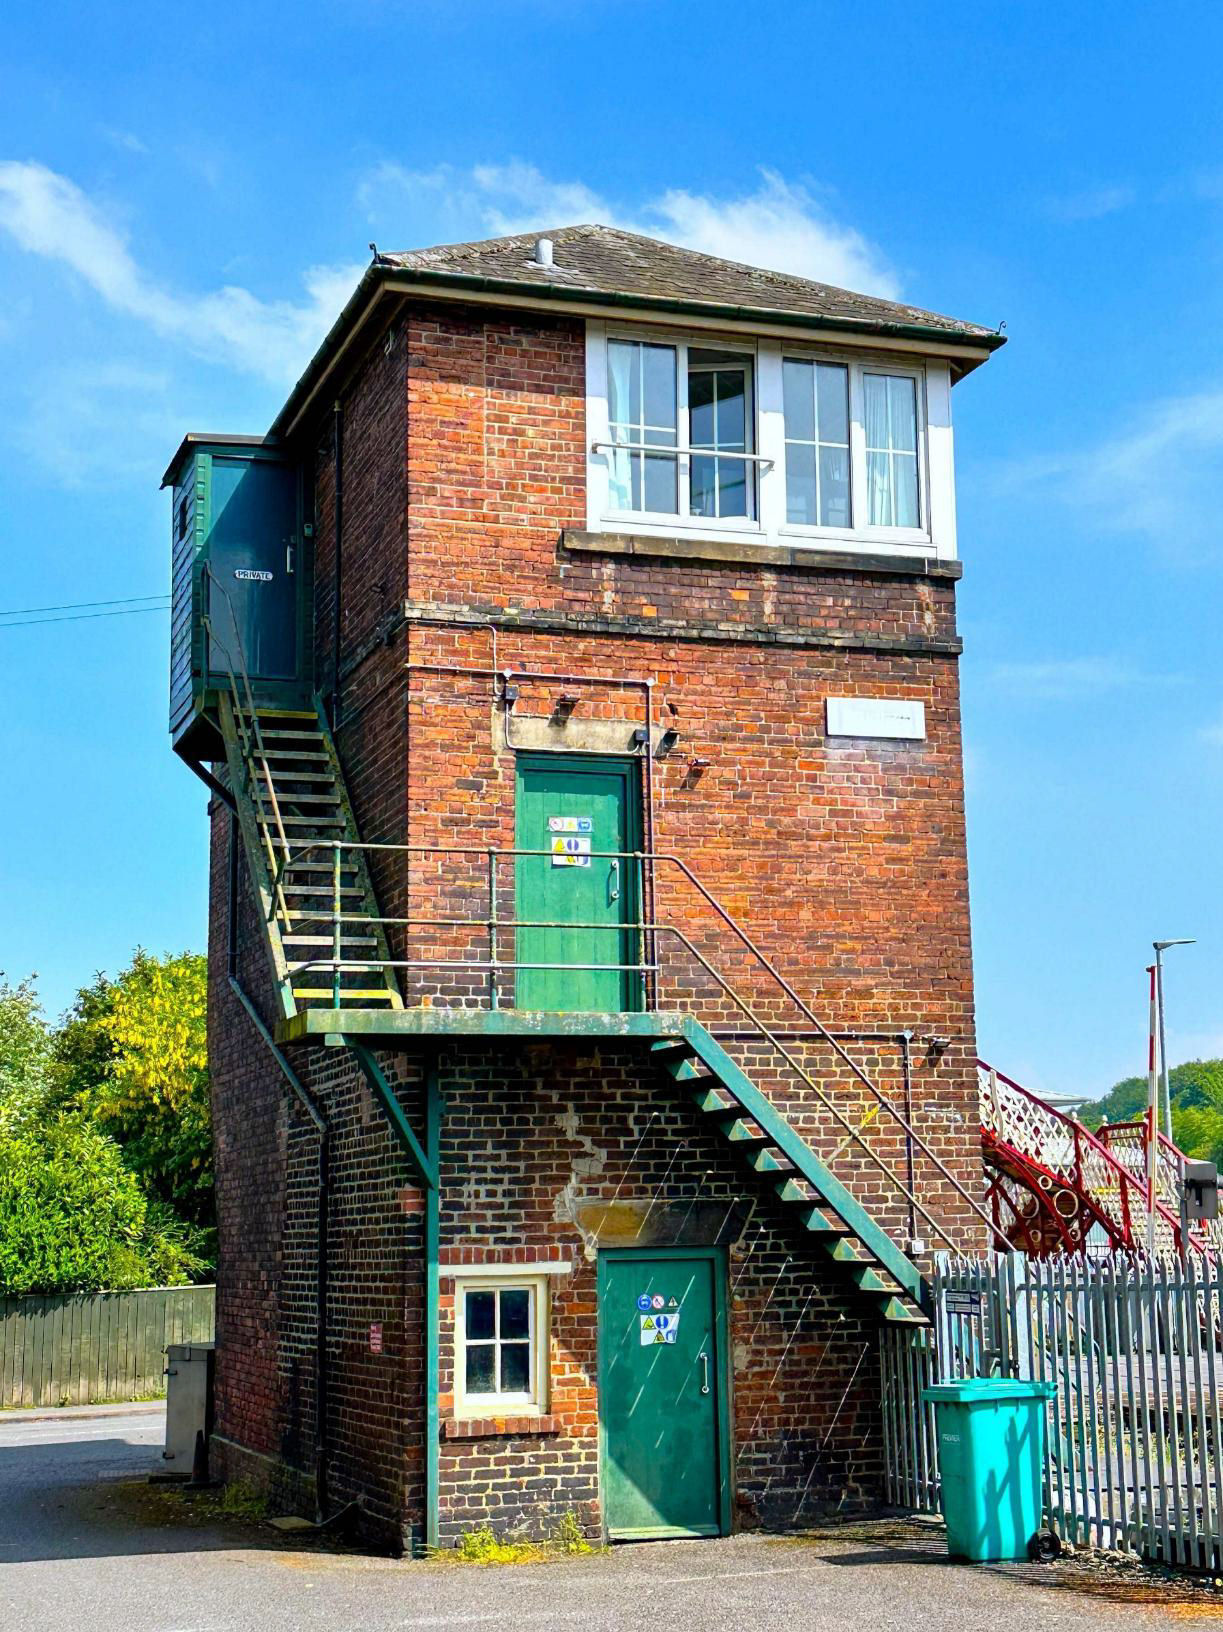
The very tall signal box at Prudhoe.
[© Mark Shinwell 2024]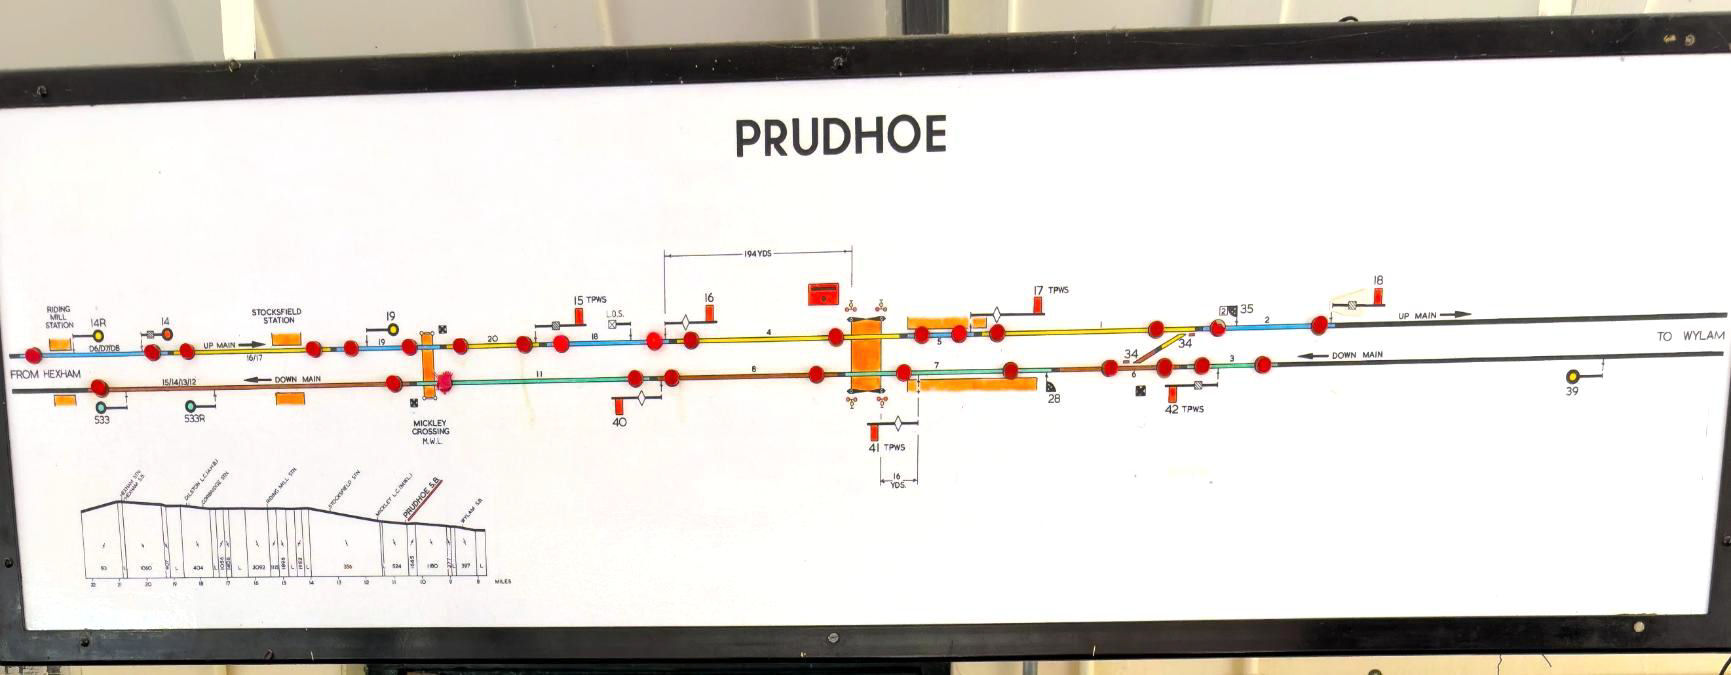
Prudhoe signal box diagram.
[© Mark Shinwell 2024]The next box to be visited was
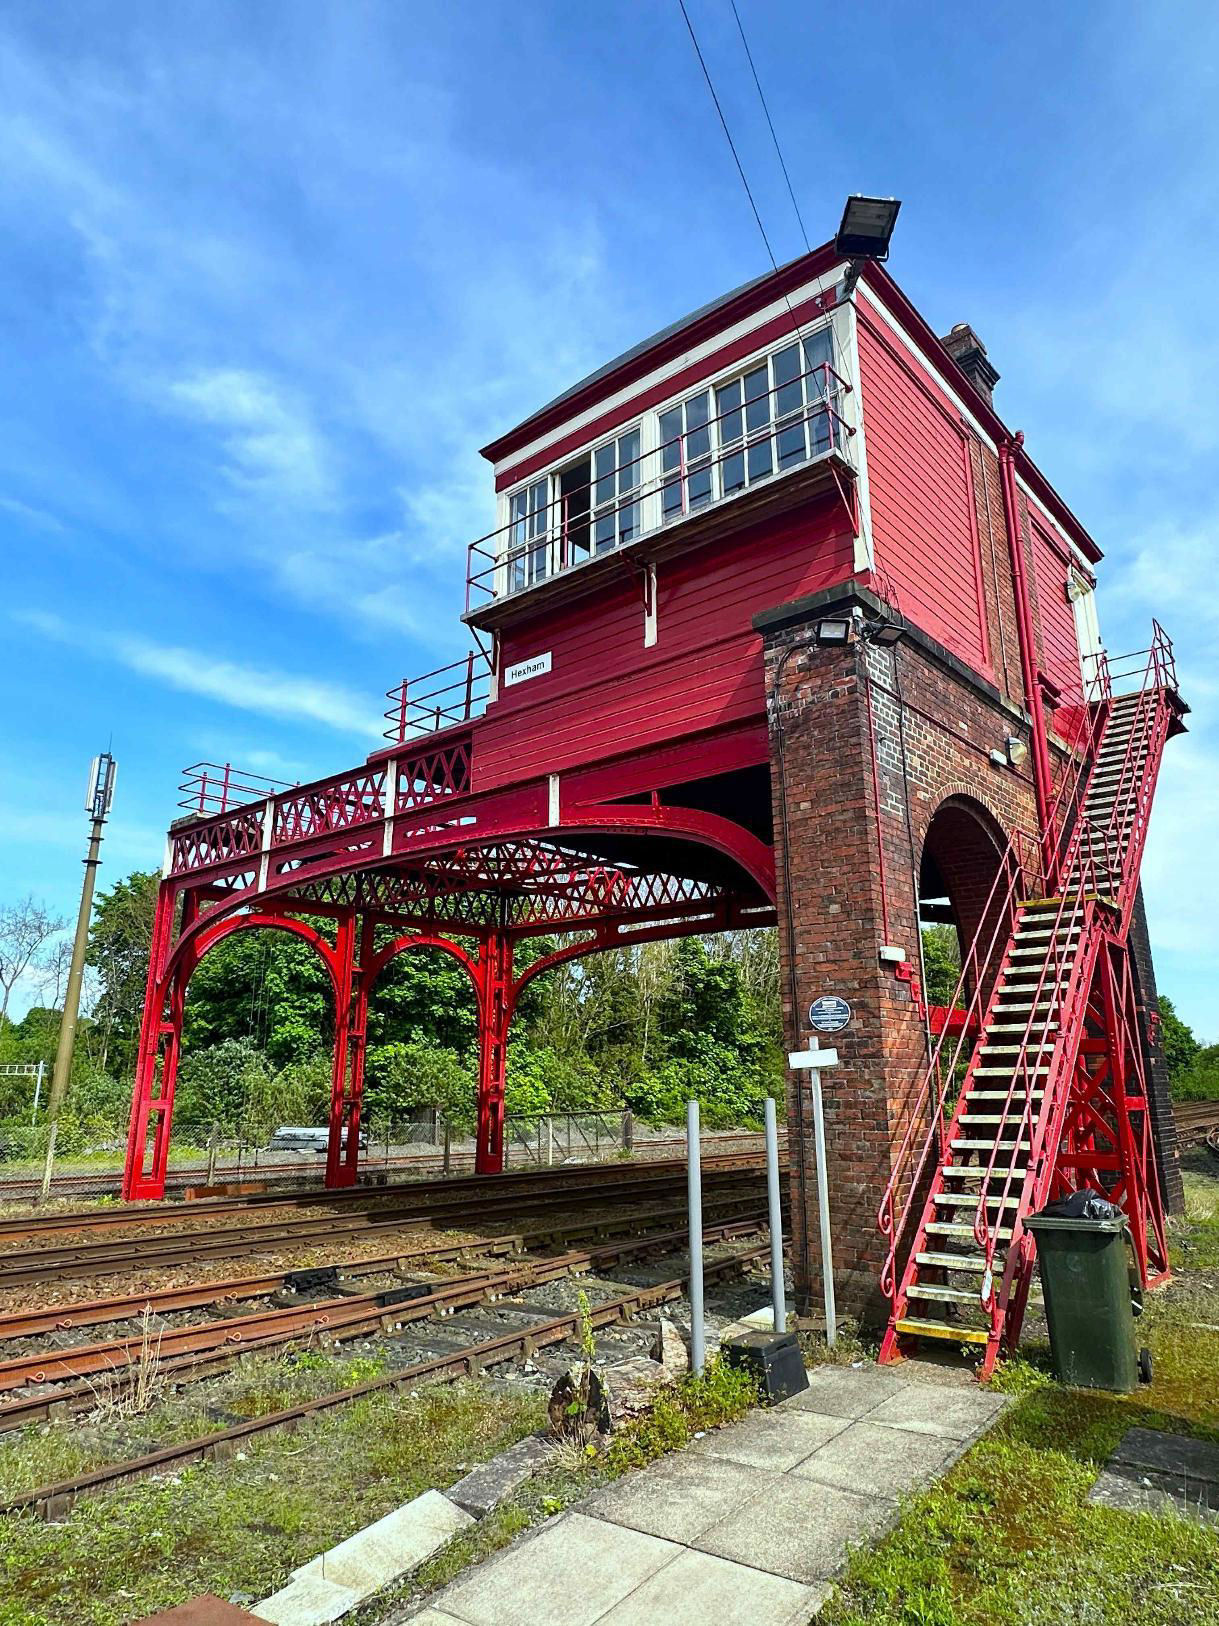
Hexham (circa 1918), this time in two groups, with the larger floor space. The box is accessed from behind Homebase, which stands on part of the goods yard site. Similarly to Wylam, the box is mounted on a cast iron structure painted in red that straddles the line, with a long external cast iron staircase to the southern side, rising up alongside cast iron rainwater goods. The wooden box sits above the Down line and contains an internal WC with tongue and groove panelled walls. A door from the box gives access to a small external area over the Up line, while a trap door in the northeastern corner leads on to an old wooden ladder (quite probably original) to the interlocking floor. The latter has restricted headroom and again contains electric locks in addition to the interlocking trays.
The Hexham signaller was pleased to see the group, which was impressed by his calm and relaxed manner in operating the box.
When not at the lever frame at Hexham, a desk of ample proportions provides a place of repose. A smaller desk with lift-up lid, similar to those which used to be found in schools and likely part of the original furniture, was also in use. Blaydon had a similar one. There was also a fine set of likely original wooden cupboards. The Absolute Block section to Haydon Bridge is controlled by a British Rail standard block instrument and trains are described to Prudhoe on a single stroke bell.
The second group saw a terminating service at Hexham being started ECS from Down P2 by one of the two remaining semaphores, before crossing to the Up line, east of the box and running back to Up P1. The 60-lever frame, with all levers still in place, is marked 'McKenzie and Holland Worcester'. Only 17 are in use. Operating these will bring welcome warmth to the signaller on cold windy days; the box is said to shake in the wind and the original fireplace is now bricked up, no longer in use. Thus, it can be chilly despite the provision of alternative heating. The chimney of the box survives. The controls in the box for Dilston AHB Level Crossing included a plunger for Down trains not stopping at Corbridge.
A loop on the Down side remains in use (Down is to Carlisle). This is confusingly called the 'Middle Road', despite not now being in between the running lines (old 25" maps show an additional through road south of it). The 'Middle Road' was included in our 7 May 2017 'Vallum Hadriani' Tracker railtour with TPE. The Up sidings also remain usable but the Down sidings are derelict and the connection to them is permanently locked out of use. Just to the east of the signal box was mounted a 'warbler' alarm which sounded for every passing train, presumably to warn any track workers or shunting staff in the area.
Hexham, looking east towards Newcastle; the nearest line is disused, the Middle Road is next.
[© Mark Shinwell 2024]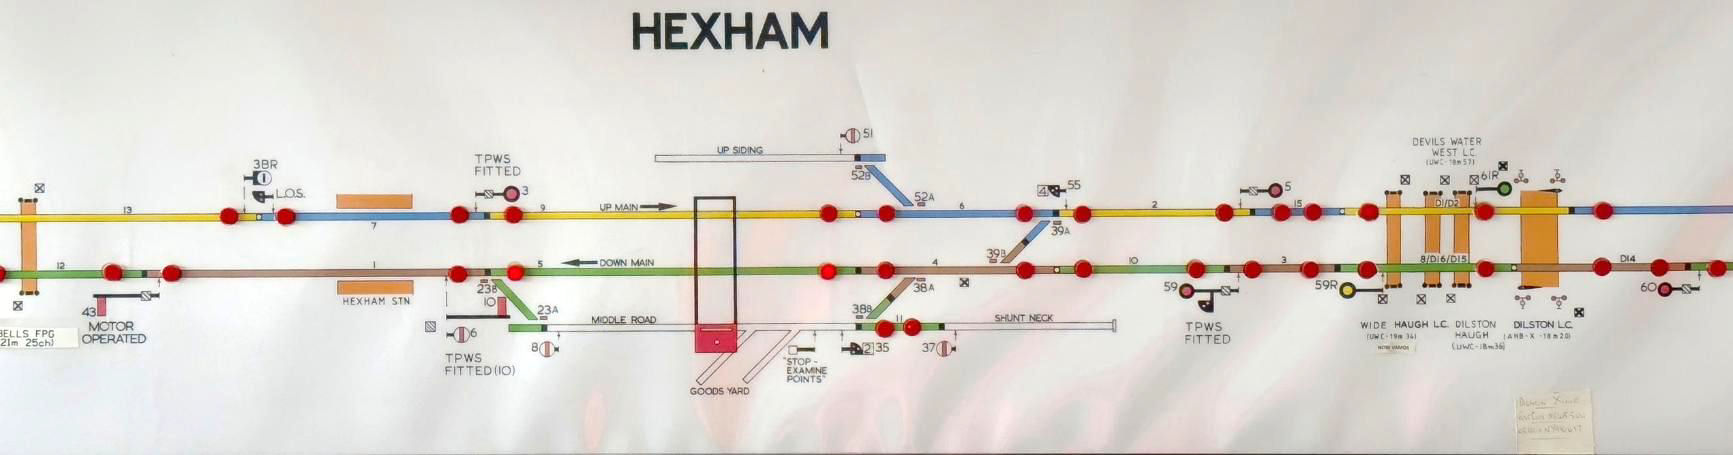
A close up of Hexham signal box diagram.
[© Mark Shinwell 2024]
The very impressive, elevated Hexham signal box, diagram, frame and view.
[© Mark Shinwell 2024]
Hexham signal box, diagram.
[© Mark Shinwell 2024]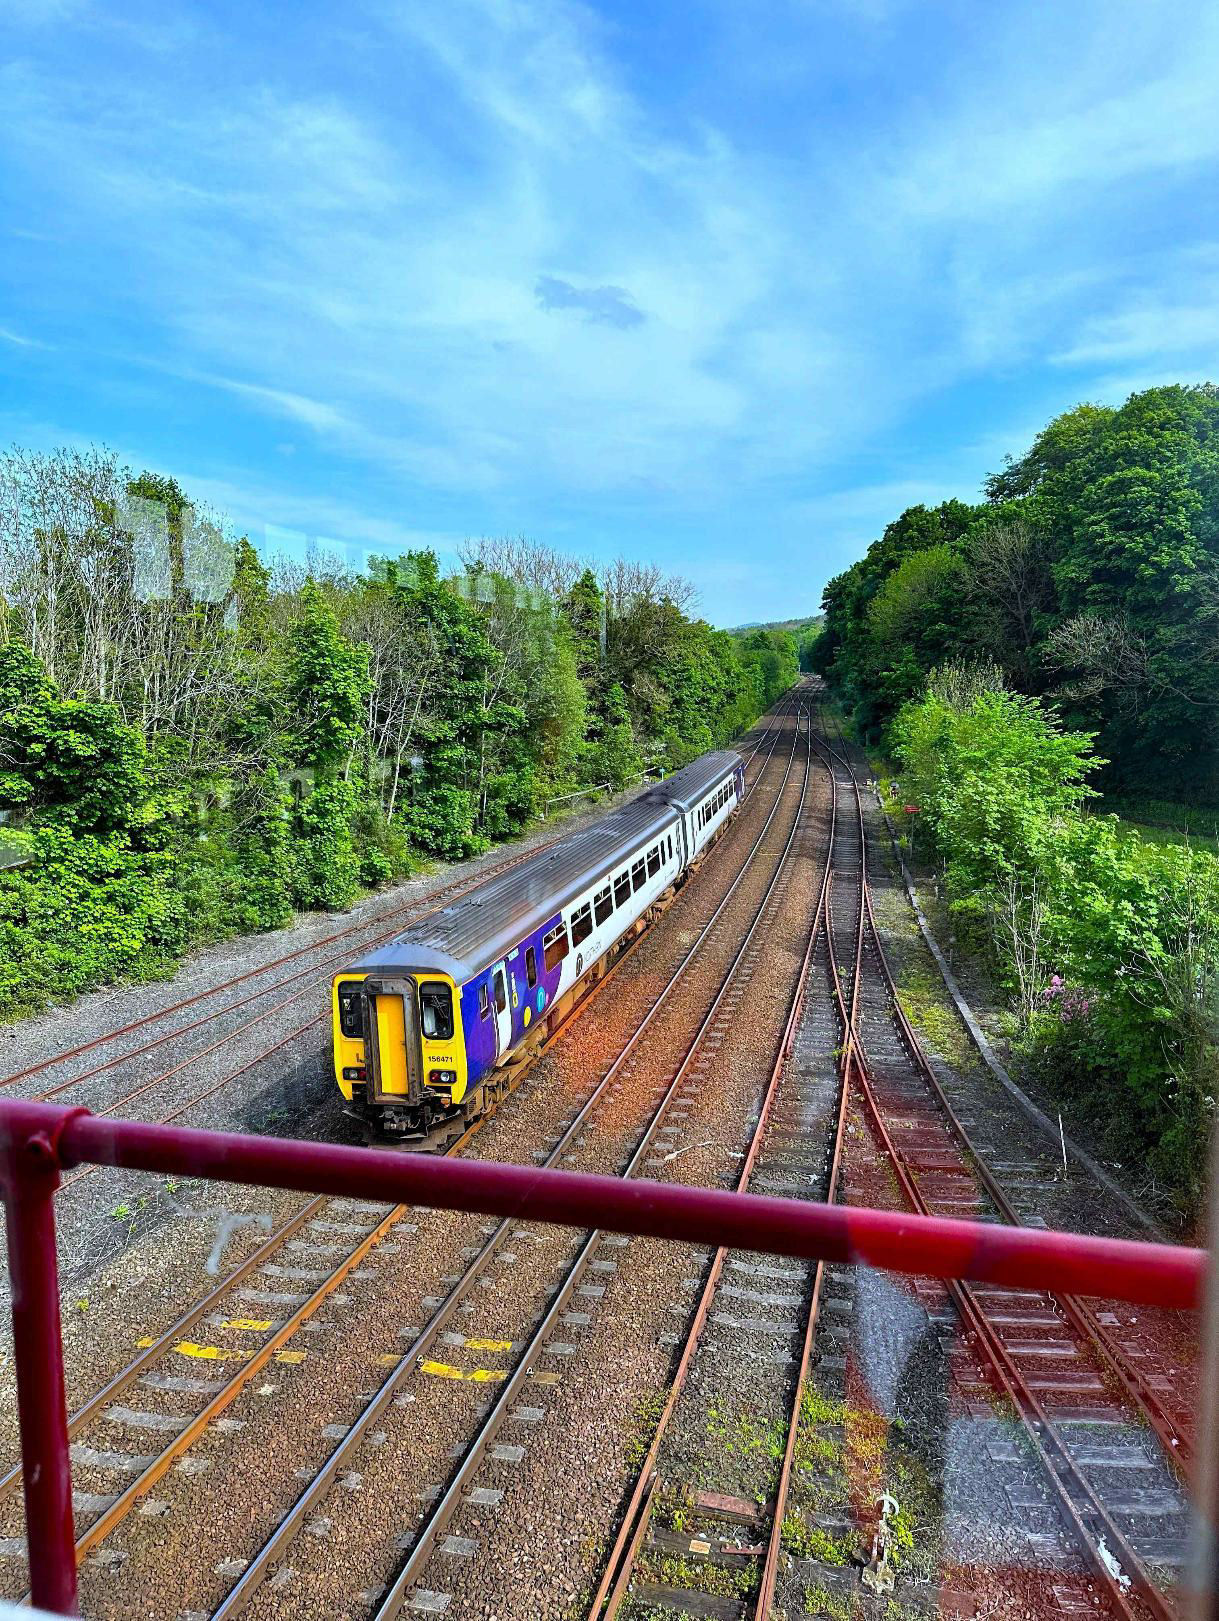
The view east from Hexham box, taken through glass, a train heads towards Newcastle.
[© Mark Shinwell 2024]The final box of the day was in some ways the most traditional, at
Haydon Bridge (1877), as it still works absolute block in both directions with each section controlled by British Rail standard block instruments. All main signals, except for colour light distants, are semaphores and there is a typical pedestal for operating the adjacent Manually Controlled Barrier crossing. Haydon Bridge box appears to be built in stone, with an external modern brick privy and lies adjacent to the station (and level crossing) on the Up side. A less common feature is that part of the western set of windows extends downwards, presumably for increased visibility of the crossing. There did not appear to be any obvious fireplace and it is unclear from old photos online how the box was heated. It does however appear to be the case that a pointed cowl, almost certainly metal and possibly lead, was mounted on the centre of the ridgeline until at least 2005. This was for ventilation but sadly only its base now remains.
Having ascended via the external steps, the group was greeted by an enthusiastic young signaller who had only recently passed out from training. There is a 31-lever frame marked 'WB & S Co Ltd', with all levers in place, of which 10 are still used. Supports underneath the frame are marked both 'BR 1957' and 'BR 1961'; the present frame was new in the box in 1964. At the west end of the frame are mountings for the former gate wheel. In the northwest corner of the box is a pair of iron wheels, painted red, one of which is marked 'LNER', together with the same marking as on the lever frame and which are used for adjusting tension of the signal wires. An annunciator provides adequate warning for the signaller of any approaching train from the west. Haydon Bridge interlocking room is accessed from ground level.
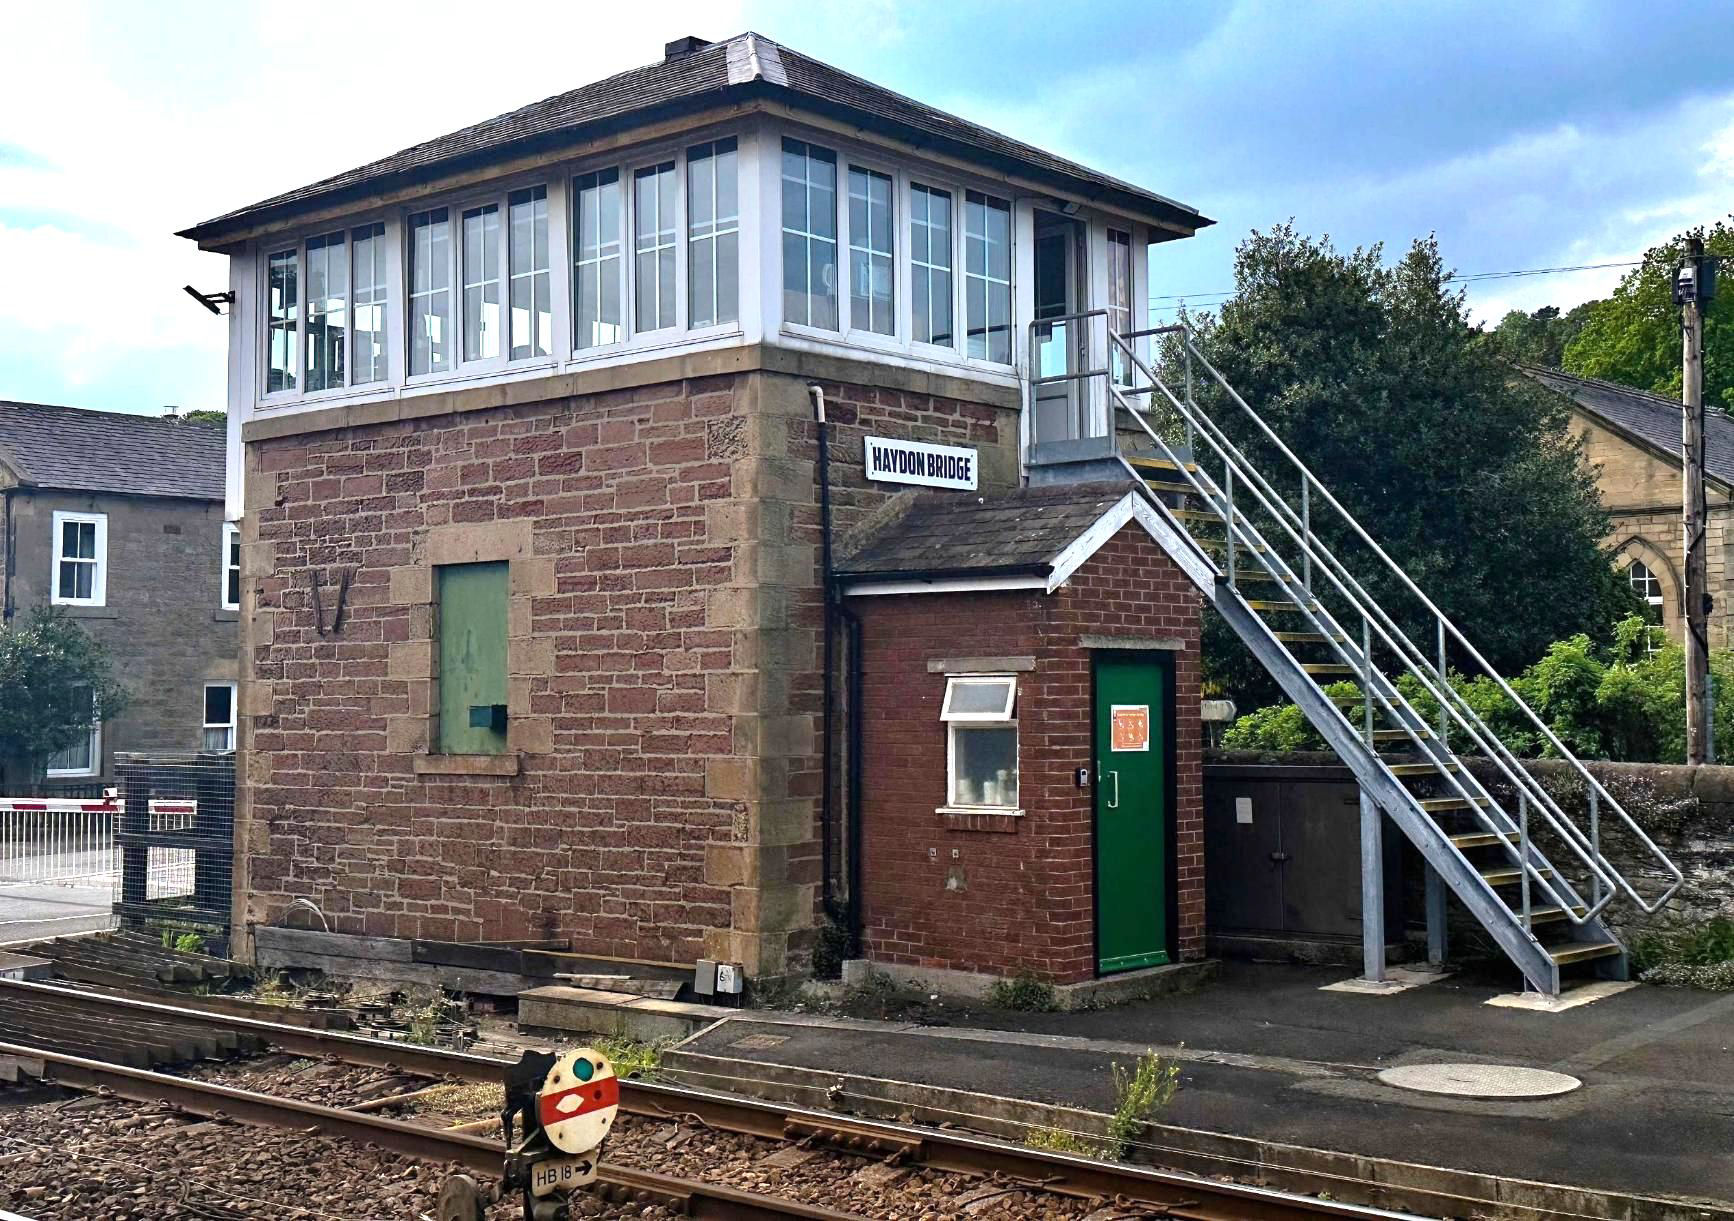
Haydon Bridge signal box.
[© Mark Shinwell 2024]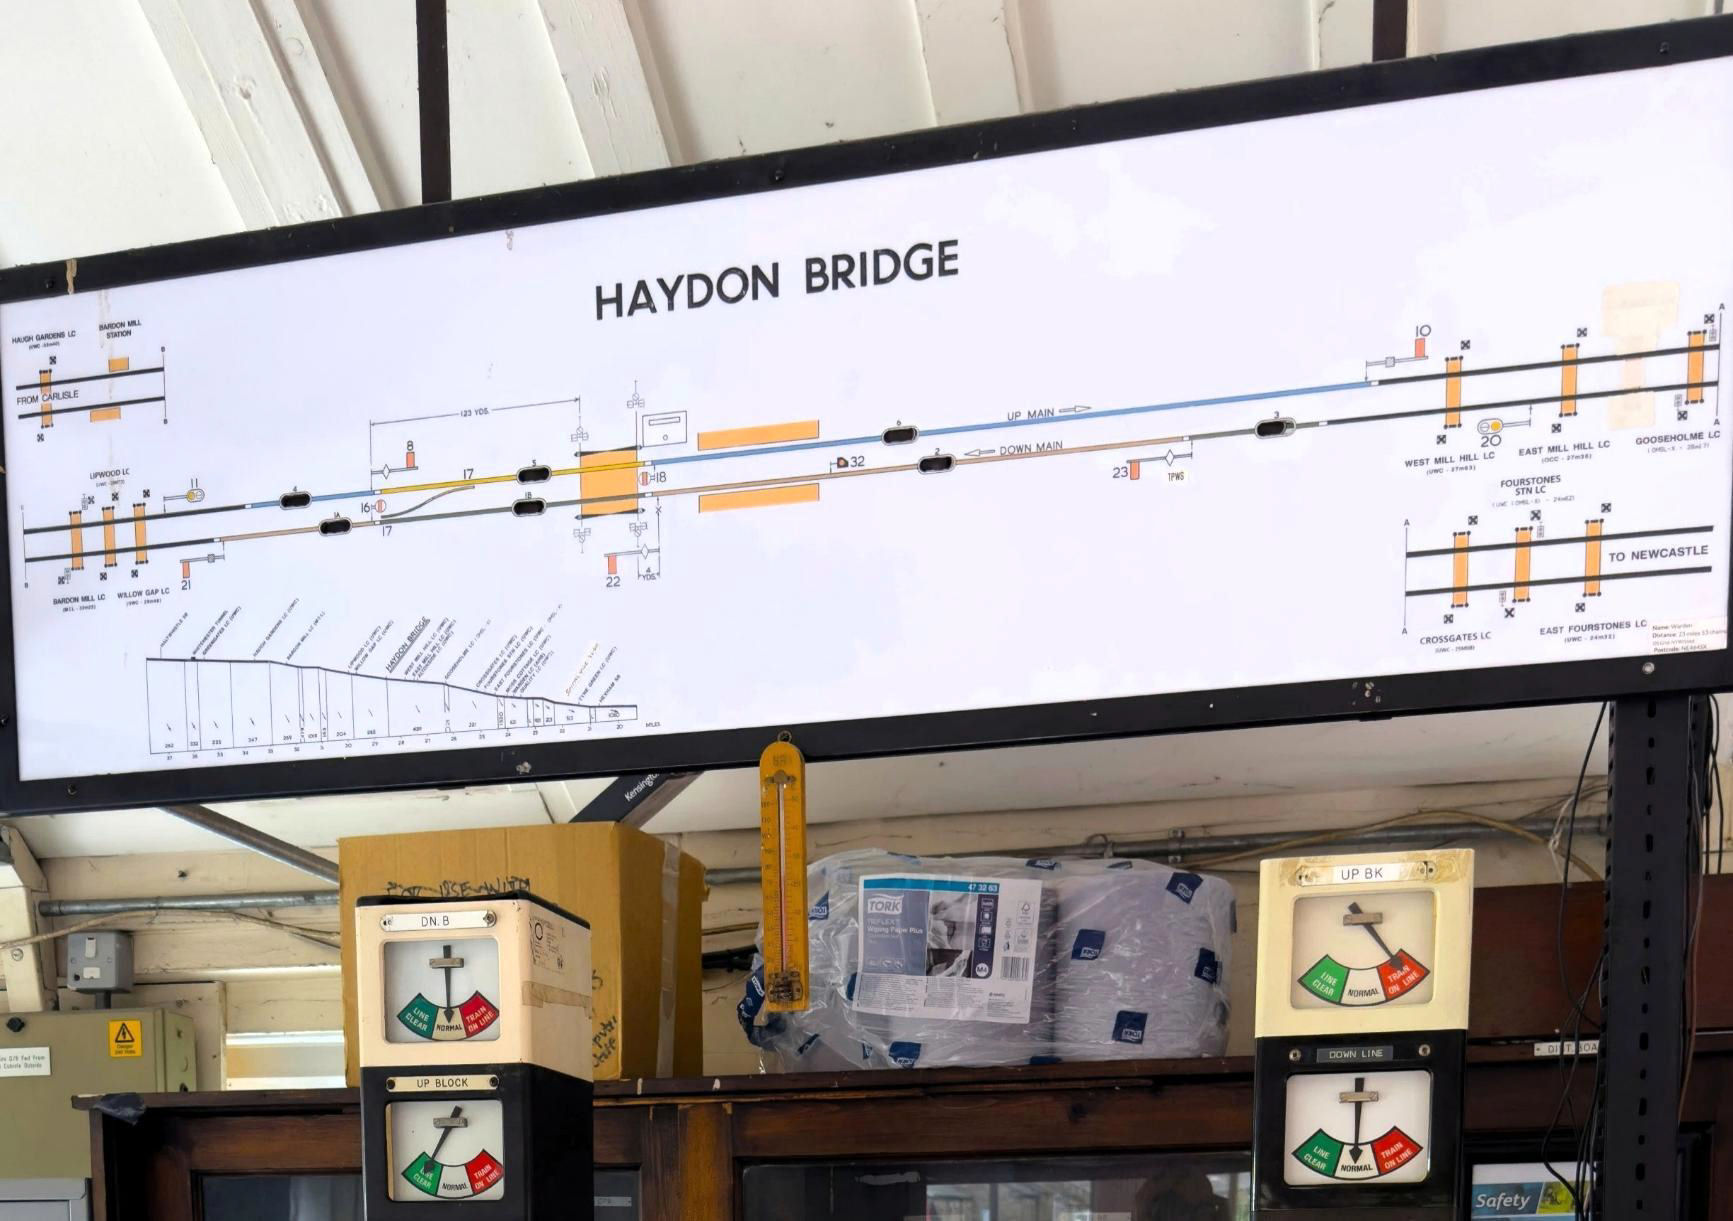
Haydon Bridge signal box diagram.
[© Mark Shinwell 2024]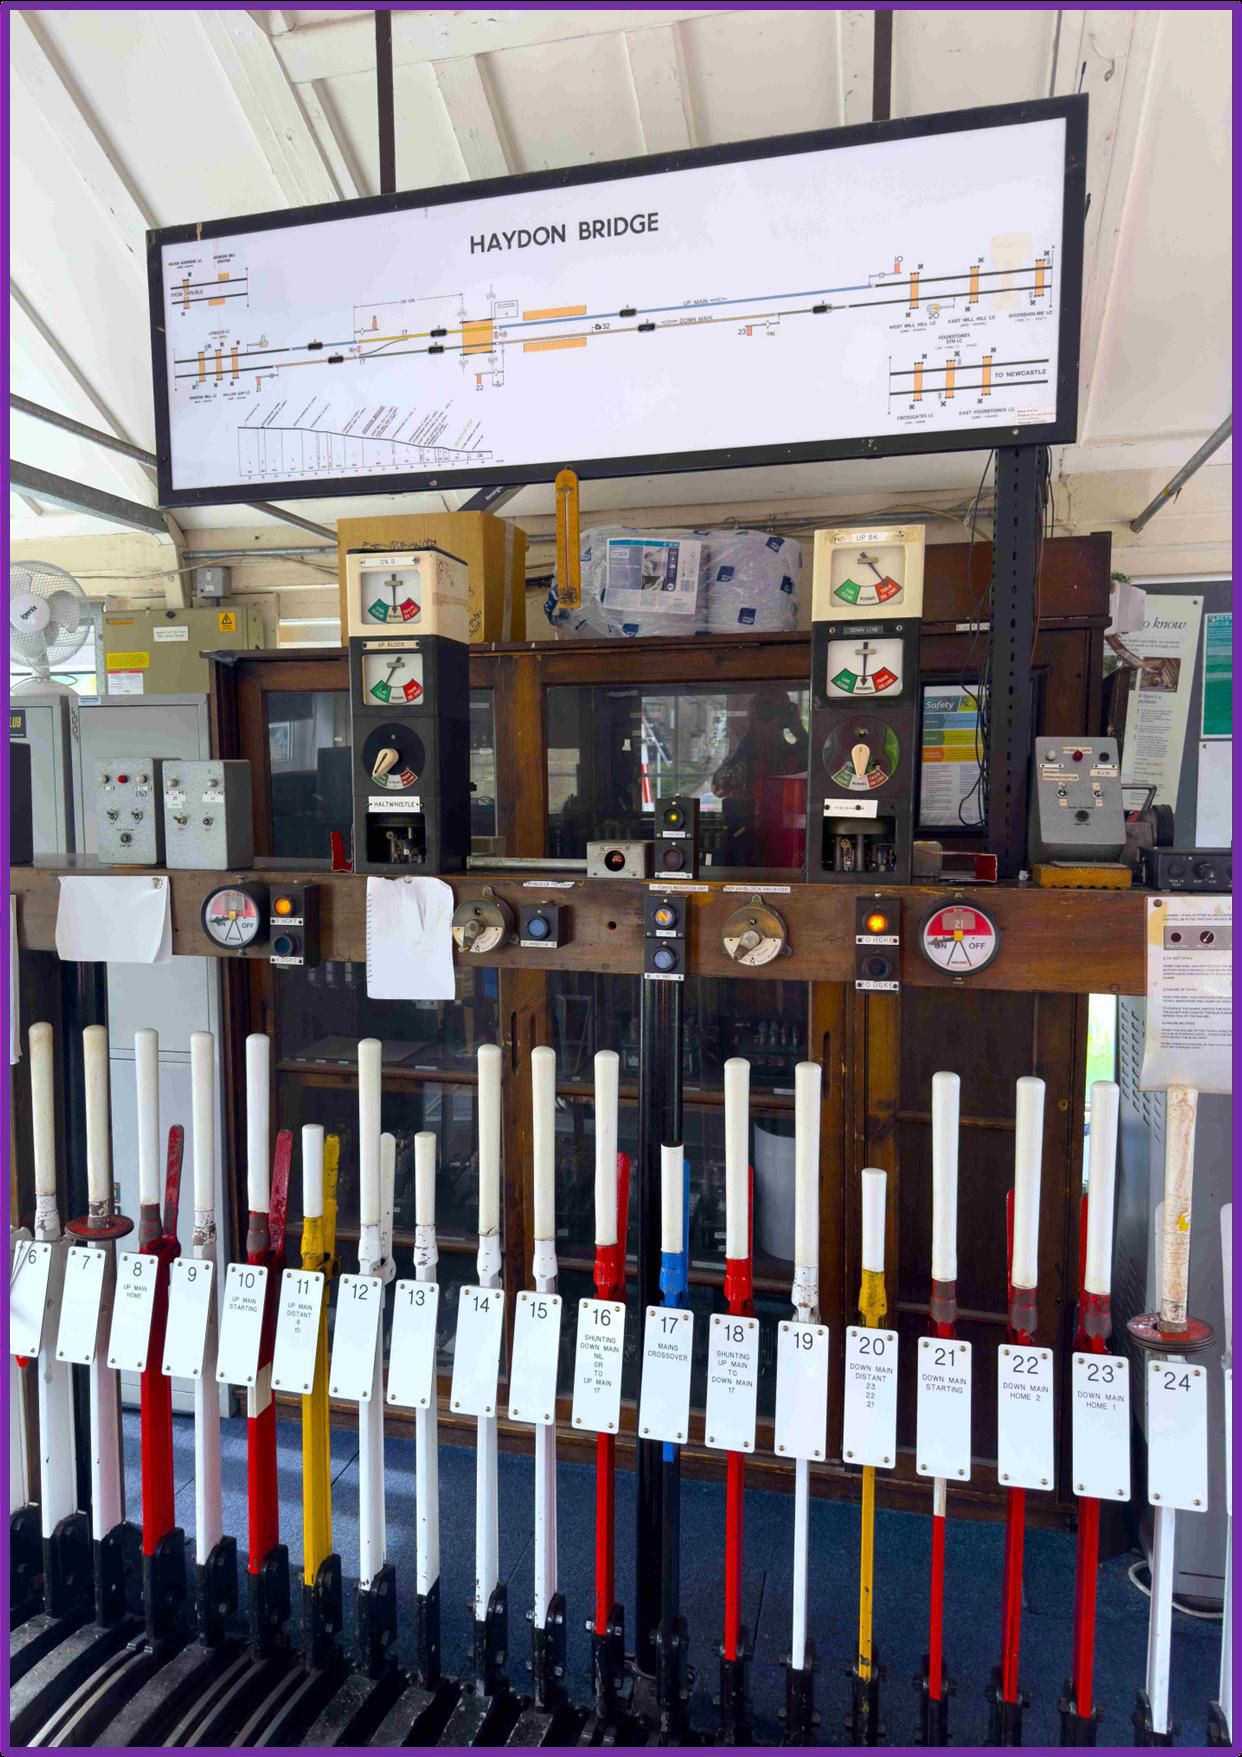
Haydon Bridge signal box diagram, block instruments and frame.
[© Mark Shinwell 2024]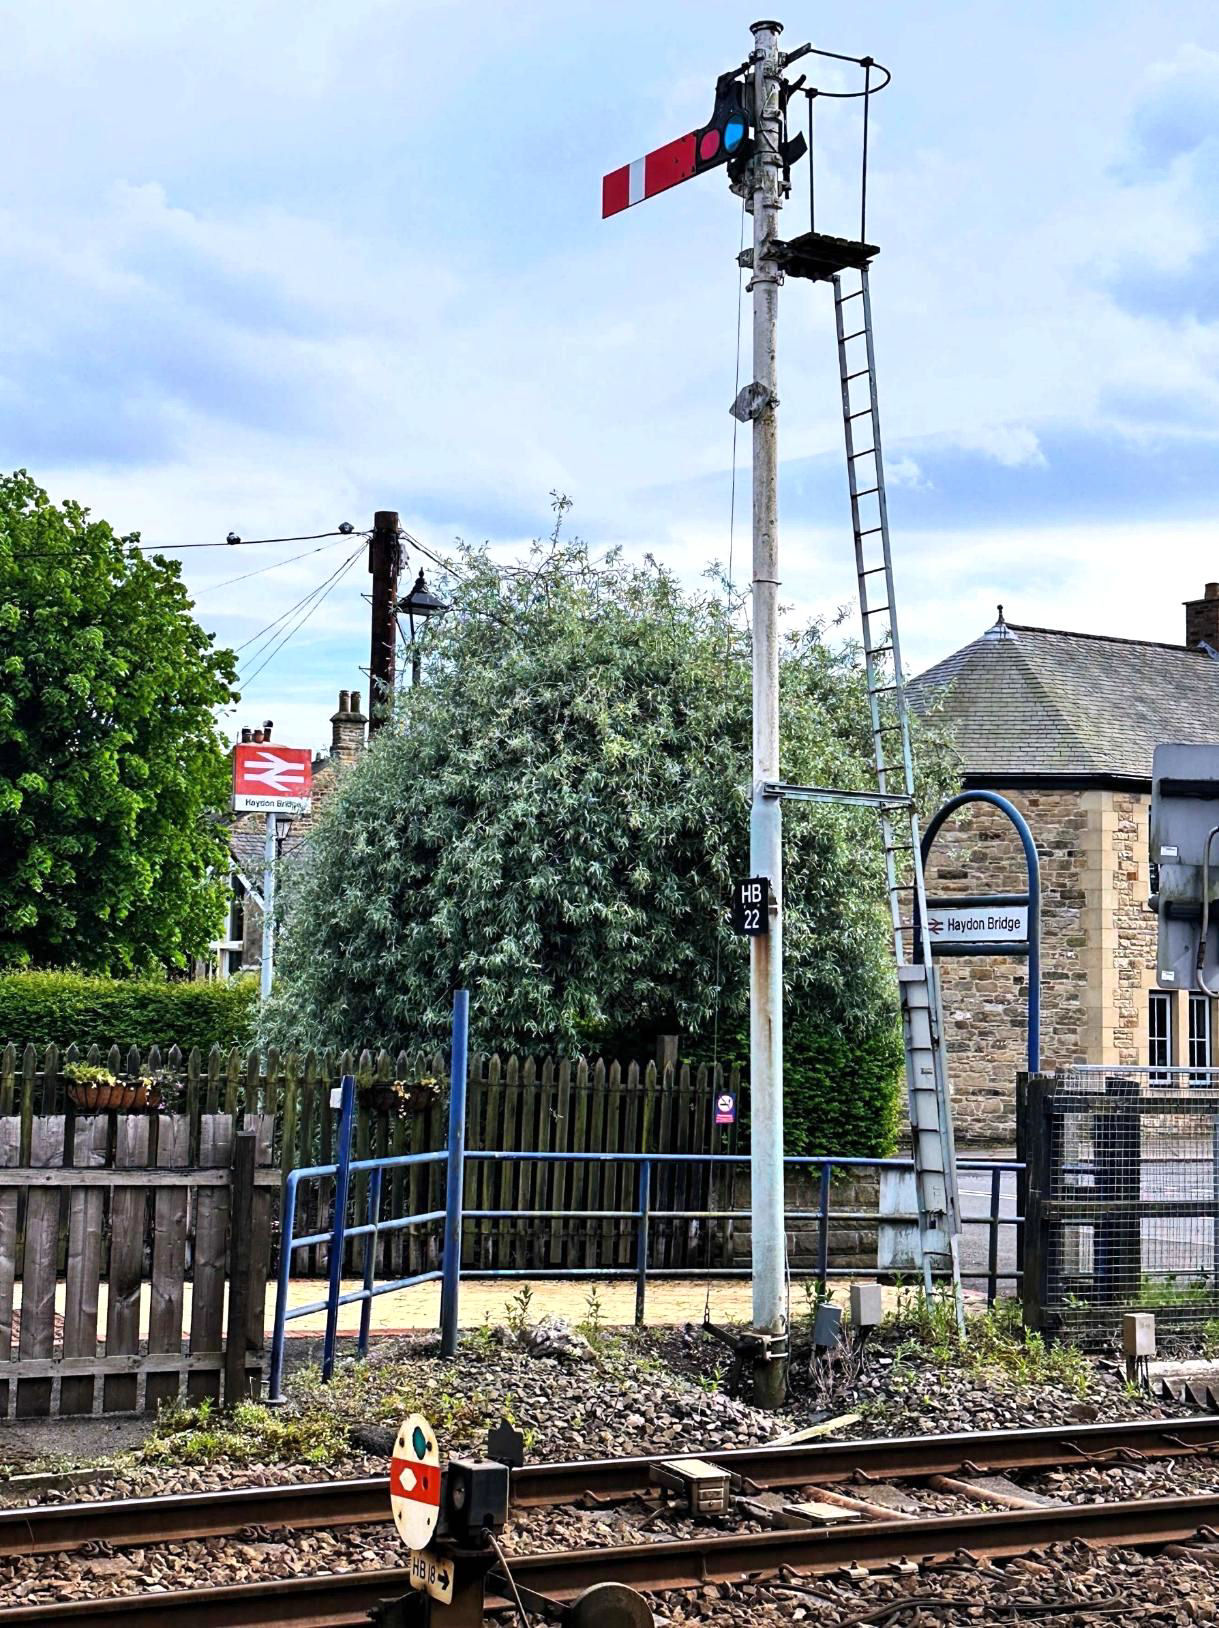
Haydon Bridge station platforms are to the left and the level crossing is right (towards Carlisle).
[© Mark Shinwell 2024]Overall, this was a very enjoyable, educational and interesting excursion that was much appreciated by all concerned. The organisers, Graham the MOM and the signallers, are thanked warmly. These visits resulted in a donation of £706.68 to Macmillan Cancer Support, the Network Rail nominated charity.